-
Teacher explains why it is important to know how to join timber when we are designing and making wooden products.
-
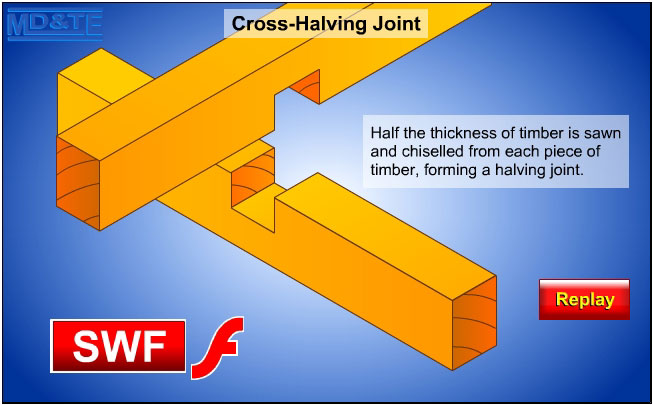
Teacher uses the Wood Joint Animation on an interactive white board to show the common types of wood joints and to explain why they are used.
-
Teacher gathers students around for a demonstration.
-
Teacher explains when a pencil is used to mark out wood and when a marking knife is used.
-
Teacher explains how to hold a try square properly and demonstrates how to mark around the end of a piece of wood using a try square and a marking knife.
-
Students are given two pieces of timber (2 off 160 x 43 x 22) and go to their benches to mark around one end of both pieces of timber.
-
Teacher stops students when it appears that most have finished marking around one end of both pieces of timber and gathers them around for the next demonstration.
-
Teacher demonstrates how to measure accurately using a steel rule. (Measuring animation).
-
Students measure 150mm from the line and mark a line around the other end of both pieces of timber using a marking knife and a try square.
-
Teacher instructs students to mark two lines, 22mm apart, using a pencil and try square, around each piece of timber, (11mm each side of the centre line).
-
Teacher demonstrates how to find the centre of one side of the timber using a marking gauge.
-
Teacher explains why it is important to choose a face side and a face edge.
-
Teacher demonstrates how to draw a face side mark and how to draw a face edge mark.
-
Teacher demonstrates how to hold a marking gauge and how to use it to mark the cross halving joint.
-
Students mark the face side and face edge on both pieces of timber, then mark lines along the centre line of the sides, parallel to the face edge on both pieces of timber.
-
Teacher demonstrates how to mark out the waste wood.
-
Teacher demonstrates how to mark lines, where the timber will be sawn, with a marking knife.
-
Teacher demonstrates how the bevel edged chisel may be used to pare along the waste side of the line so that a tenon saw may be located easily next to the line.
-
Teacher demonstrates how to use a tenon saw to saw down to the centre line.
-
Teacher demonstrates how to use a coping saw to remove the waste wood on both pieces.
-
Students use marking knives to finish marking out their joints and cut them using a tenon saw and a coping saw.
-
Students demonstrate how to hold the timber in the vice and to use a paring chisel (bevel edged chisel) to pare away waste wood down to the line, working from both sides into the middle.
-
Students pare away the waste wood and assemble their joint.