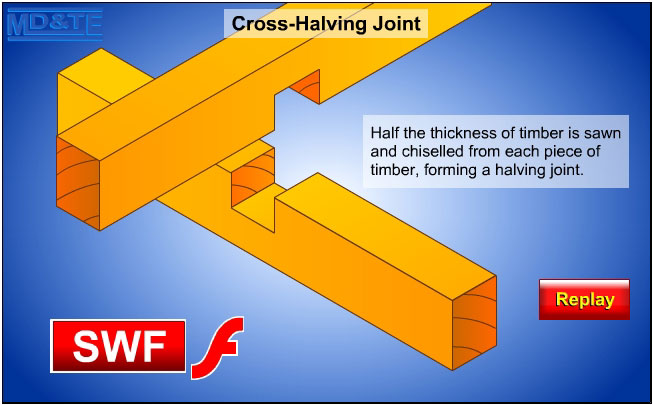
Click on the screenshot above to view the "cross halving joint" animation by Laszlo Lipot
An image showing the Flash animation logo  is a
link to a Flash animation. is a
link to a Flash animation.
Flash animations are embedded into the pages of all my D&T Modules but there are pictorial links to the animations on this web site so that devices that cannot play Flash animations will at least show a jpeg screenshot of the animation.
If your PC or personal digital assistant (PDA) can play Flash animations you may click on an image showing the Flash animation logo  to view the animation in a new window. to view the animation in a new window.
(Your browser may require you to click "Allow Blocked Content" to view the animation). See info about viewing Flash animations. |
Making a Cross Halving Joint: Learning Objectives
Pupils should learn:
- that gluing to end grain makes a weak joint
- that there are standard wood joints that avoid gluing to end grain only
- that standard wood joints may be adapted for particular purposes
- to measure accurately using a steel rule,
- to use a try square, marking gauge, pencil and marking knife
- to use a tenon saw, coping saw and bevel edged chisel
- glue timber using PVA glue
- clamp timber using a G-cramp.
Resources
Each pupil will need:
- 2 pieces of softwood 160 x 45 x 22
- work station on a woodwork bench fitted with a woodwork vice
- pencil, marking knife, try square, marking gauge, tenon saw, bench hook, bevel edged chisel.
Activity
-
Students are given two pieces of timber (2 off 160 x 43 x 22) and go to their benches to mark a line around one end of both pieces of timber using a try square and marking knife.
-
Students measure 150mm from the line and mark around the other end of both pieces of timber.
-
Students mark the face side and face edge on both pieces of timber, then mark lines along the centre line of the sides, parallel to the face edge on both pieces of timber using a marking gauge
-
Students use marking knives to finish marking out their joints and then cut them using a tenon saw and a coping saw.
- Students pare away the waste wood and assemble their joint.
Wood joints module directory
|